
Procedure for Assembling a Trampoline in Kenya
Trampolines are gaining popularity in Kenya for both commercial and domestic use. This then increases the demand for people to learn the procedure for assembling a trampoline. Below is a six-step by step procedure for assembling a trampoline at home. In case you missed the article on how to disassemble a trampoline at home, click here to find out how.
Contact Us for a Brand New Heavy Duty Trampoline;
Step 1: Preparation and area setup.
Trampolines are best installed on a level ground and one that has no rocks or anything that can destroy the trampoline especially while bouncing. I’m sure by this time you have already decided the size of the trampoline you are getting depending on the amount of space you have on your compound.
Step 2: Remove and lay all the trampoline parts on the ground.
The trampoline is usually delivered in one box that has the following parts:
- Galvanized steel frame
- Trampoline legs
- T-section joints
- Enclosure poles (Pole sponge and pole sleeves)
- Safety net
- Ladder
- Spring cover pad (Enclosure strings)
- Jumping mat
- Pole caps or connectors (14 ft trampolines use pole caps while 10 ft trampolines have connectors)
- Spring tool
- Spanner
- Screws
- Alanki
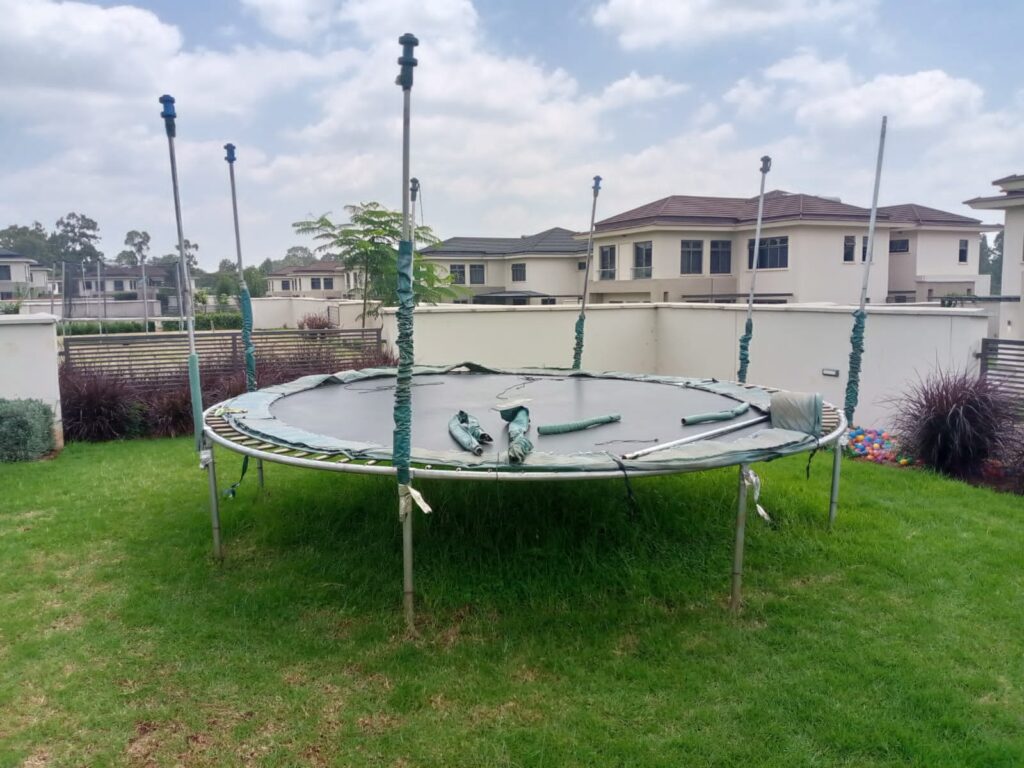
Step 3: Setup the Trampoline frame step by step.
Place the trampoline steel frame and the T joints, they should form a circular shape. Ensure you have the same number of steel frames and T joints. The purpose of the T joints is to provide a connection to the trampoline legs. The next part is joining the steel frames together to form a circular shape. Once the perfect circle is formed, the trampoline is starting to take shape and you can now start seeing where the jumping mat and the legs will go.
The next step is adding the legs, as stated earlier, the T joints act as connectors for the legs. Start by adding one dual leg using the screw and a screwdriver then move to the next leg once done. Kindly ask for assistance when adding the legs.
Ensure the legs are screwed tightly to avoid accidents.
Step 4: Add the trampoline mats and springs
The trampoline mat and springs are the most important parts of the trampoline so be certain of the following things before you start setting up:
- The trampoline jumping mat has no tears or holes.
- The springs are unused, they should brand new.
- You have the spring tool.
If the following things are in check, you can start attaching the trampoline mat and springs.
Using a spring tool, attach one spring to one side of the trampoline, skip 4 unhooked spring points then attach the next spring. Follow this process until you get to the point that you began from. After that, attach the rest of the springs. This makes it easier to attach springs to all sides of the trampoline without using so much strength on one side of the trampoline. It also makes the trampoline mat balanced and the mat will not be damaged on one side.
Add the spring cover pad by tying the strings to the frame securely. This provides safety for the children while playing.
Step 5: Build the trampoline enclosure
The trampoline support fixtures can be added before or after the trampoline padding. It’s up to you. We will add them at this point. Most modern trampolines have the enclosure support brackets fixed to the trampoline legs which provide extra support and stability.
Attach the first support pole to the trampoline fixture. Line it up correctly and secure the screw into the hole. Make sure it’s tight and feels secure. After securing the bottom of the enclosure poles to the trampoline legs, next, we build up the trampoline enclosure poles to full height. They should slot together and secure quite easily.
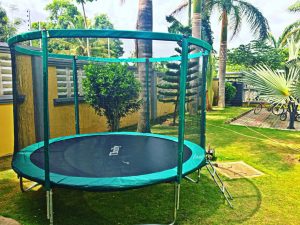
Step 6: Add the safety net to the trampoline.
The purpose of a safety net is to ensure that the child doesn’t bounce off the trampoline while playing.
Here there are the steel rods and the connectors. At the top of the safety net, there are some spaces where the steel rods and the connectors are to be inserted. Insert the steel rod on one side of the net and it should come out on the other side where you should insert one of the connectors. The purpose of the connectors is to attach all the rods together, connect the net to the trampoline poles and, in the end, form a perfect circular shape.
Finish this process by securing the net with hooks that easily hook to the springs. Ensure you hook all of them to provide safety.
Step 6: Attach the trampoline ladder
The trampoline ladder provides easy access to the trampoline for the children.
This could be the easiest part of the trampoline assembly process, all you need to do while attaching the ladder is to place the ladder adjacent to the trampoline zip the turn the handles to securely hook to the net.
For more enquiries, brand-new heavy-duty trampoline purchases and repairs, trampoline accessories & trampoline replacement parts in Nairobi Kenya contact 0722724893. You can also visit the Frugal Innovations website & www.thriftyent.com


- Why Every Nairobi Parent Should Consider a Trampoline This Cold Season
- Safe Weekend Fun: Premium Trampolines for Schools, Homes & Events in Kenya
- The Labour Day Trampoline Bounce: Celebrating Hard Work the Fun Way in Kenya
- Frugal Innovations Kenya: The Undisputed Leader in Trampoline Repair and Maintenance in Kenya
- The Science Behind Trampolines: Why Every Bounce Matters in Nairobi Kenya